We were going on holiday to Barbados and going to be snorkeling for the first time. How could I not try to get pictures of that? Two problems: the price of a professional underwater camera bag, and the quality of underwater point-and-shoots. So we compromised and designed a flexible underwater casing for my Olympus E1. This design can be customized to fit almost any SLR.
Once you have the materials, this underwater bag takes a few hours to assemble. I used this bag in the ocean at depths up to about 10 feet, and it never let any water in.
The upsides:
- The camera stayed dry and safe.
- I got to take high-resolution underwater pictures.
- I didn’t have to pay the cost of another SLR to get the casing.
- The casing is relatively compact.
The downsides:
- It is hard to change the settings once the camera is in the bag, so I had to do some trial-and-error and guessing to set up the shot.
- Autofocus was a bit spotty, but that might depend on the camera.
- The design does not (yet) include a strap or ergonomic handle. It took a while to get used to holding it, and given its size restricts your movements somewhat.
In general, you want as bright of a day as possible, and you’ll probably still need to raise your ISO to at least 200 or maybe 400 to get blur-free shots. Autofocus worked alright, but it is very hard to look through the viewfinder. If you have a camera with autofocus in liveview, this should work much better. I usually ended up pointing the camera in the general direction of interesting stuff, taking a bunch of pictures, and going through them after to find the good ones. If you find your autofocus a little unreliable, it may work best to use a wide angle lens, keep your aperture fairly high (f8 or so), and keep your camera focused at infinity. Unless the fish are very close, that should work well.
Materials needed:
- One shower drain
- One large Aloksak plastic bag
- 2 feet of aluminum rod
- 2 small rubber washers
- a small piece of anti-reflective glass or (preferably) plexi-glass
- silicone caulking
- closed cell foam or gasket material (to make sure your lens fits tightly into the drain)
- Smaller aluminum, bamboo, plastic stick
Tools needed:
- Hacksaw (for cutting through PVC)
- File (for smoothing plastic edges and making ridges in the aluminum rods)
- Pen (for outlining the lens port)
- Coping saw (for cutting out the circular lens port from the plexi-glass)
- Utility knife (for cutting foam spacers and the hole in the plastic bag)
I picked up all of this from my local Home Depot, except the Aloksak bag which you can get from an outdoor store (MEC for me).
First, make sure your Aloksak bag is big enough to fit your camera and lens. If it’s not, get a bigger one.
Next, make sure your shower drain has a large enough drain hole to fit over the front end of your lens. (I had to file the threads out of the center of the drain I bought to fit over my Olympus 14-54 lens) It’s ok if it is a little bit bigger, but it can’t be smaller. Everything fits? Excellent – we can now build the bag.
This is the drain as it comes from the store.
Here is the drain completely disassembled. The parts we are going to use are the two large plastic pieces that thread together, the black rubber washer and the cardboard washer. Save the rest for a rainy day or throw it out.
This particular drain had a small lip on the bottom that the lens couldn’t fit through, so I cut that off. Do whatever cutting or filing you need to so that the lens fits. Make sure to leave some of the threading.
Sawing the plastic left some burrs, so I smoothed them out. File down any sharp edges. Assemble the pieces to make sure everything continues to fit together smoothly and securely.
The lens port needs to cover the entire front of the drain, including the flange. Trace out the drain cover on the protective plastic film of the plexi-glass.
This was the trickiest point. At one point I put too much pressure on the saw and cracked the plexi-glass. Of course, I had a huge sheet so lots of room for error. Make sure you don’t put too much pressure on the saw while you’re cutting and cut out the circle (with the protective film still in place).
Back to the drain. I wanted to make sure the cover fit securely on the lens to keep the plastic parrallel to the front element, and the keep the camera from floating around inside the bag. Use closed cell foam or gasket material (depending on the thickness you need) to friction fit the lens inside the drain. You don’t want to put too much pressure on the lens, but you do need the shower drain to be secure. Experiment until you are happy with the fit.
Now you need to secure the plexiglass to the drain with a watertight seal. Silcone the flange of the drain, making sure to get a continuous bead all the way around. Push the plexi-glass against the drain, lining up the edges. You should not have any gaps or air bubbles. You also don’t want so much silicone that it squeezes out everywhere, especially inside the drain as that can impact the optical quality. Outside can be cleaned up with the utility knife. The flange is probably big enough that you can get a good seal without excess silicone.
The lens port fully assembled. Wait for the silicone to dry before putting any stress on it.
Cut a hole in one side of the Aloksak bag, just large enough for the small end of the drain to fit through. I put the hole in centre of the bottom. That made the seal on the bag block the viewfinder. Learn from my mistakes.
Put the drain (plexi-glass side down) on the table. Put the rubber gasket on, then slip the Aloksak bag over the drain threads so that the threads protrude into the bag (see picture). Reach inside the bag, put on the cardboard washer (or whatever second gasket you might have) and thread on the final part of the drain (this part the didn’t require any modifications). Make sure this is tight! The bag will be pinched between the two washers, and the whole thing secured by the threads of the drain.
Put your camera in the bag and seal the zipper, taking out most of the air. More air means it will be harder to keep the camera underwater. A little bit of air might slow its descent if you drop it (this did not get tested).
You now have a waterproof camera bag. While I was very confident in the water-tightness of the lens port and bag, the zipper on the bag is not particularly strong (Aloksak bags are Navy rated and supposed to be waterproof, but this is my camera we’re talking about.)
To make sure the seal on the bag wouldn’t open, particularly due the pressure of holding the bag, I cut two pieces of aluminum rods about 1″ longer than the length of the bag seal. I used the file to make a groove .5″ in from each end of the rods, so that a rubber washer could be cradled in it and hold the rods together extremely tightly.
Once your camera is in the bag and the zipper is sealed, fold the end of the Aloksak on itself. Slide the folded edge between the two pieces of aluminum rod so that the fold is on one side and the zipper and camera are on the other. Slip the rubber washers over the ends of the aluminum rods, then slip the thin dowel through the fold.
Now you’re ready to go snorkelling with your SLR. Have fun!
Oh, and just to give you an early warning system if you do have a leak, put an alka-seltzer tablet in the bag with your camera. If water gets in the bag, the tablet will foam up, and you’ll know right away to surface and protect your equipment.
Here are a few photos I got with this setup:
To see where we went snorkeling and some more pictures, see http://travelsandtrails.com/place.php?place_id=98.
Note: This worked for me. I take no responsibility for any ruined SLR cameras out there. For the love of SLRs, test it in the bathtub first.
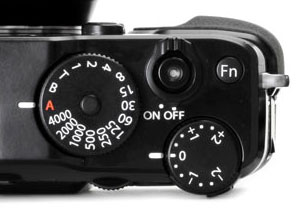
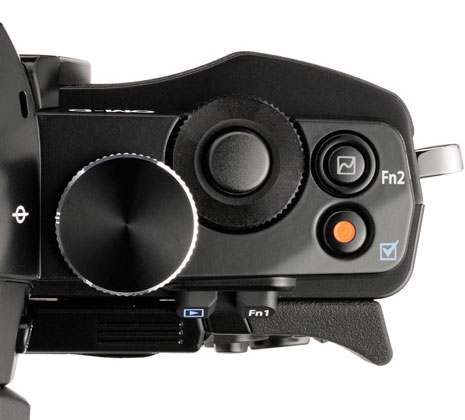
 The one dial that camera manufacturers have actually kept as a real dial is the mode dial, which is the worst one to keep on SLRs. This should be the least used dial, and by making it a proper dial and encouraging its use they’re actually dumbing down the camera. And I’m not at all against auto settings. I’m just for education and knowledge, and this dial hides all that.


