Making an Underwater Camera Bag

We were going on holiday to Barbados and going to be snorkeling for the first time. How could I not try to get pictures of that? Two problems: the price of a professional underwater camera bag, and the quality of underwater point-and-shoots. So we compromised and designed a flexible underwater casing for my Olympus E1. This design can be customized to fit almost any SLR.

Once you have the materials, this underwater bag takes a few hours to assemble. I used this bag in the ocean at depths up to about 10 feet, and it never let any water in.
The upsides:

  • The camera stayed dry and safe.
  • I got to take high-resolution underwater pictures.
  • I didn’t have to pay the cost of another SLR to get the casing.
  • The casing is relatively compact.

The downsides:

  • It is hard to change the settings once the camera is in the bag, so I had to do some trial-and-error and guessing to set up the shot.
  • Autofocus was a bit spotty, but that might depend on the camera.
  • The design does not (yet) include a strap or ergonomic handle. It took a while to get used to holding it, and given its size restricts your movements somewhat.

In general, you want as bright of a day as possible, and you’ll probably still need to raise your ISO to at least 200 or maybe 400 to get blur-free shots. Autofocus worked alright, but it is very hard to look through the viewfinder. If you have a camera with autofocus in liveview, this should work much better. I usually ended up pointing the camera in the general direction of interesting stuff, taking a bunch of pictures, and going through them after to find the good ones. If you find your autofocus a little unreliable, it may work best to use a wide angle lens, keep your aperture fairly high (f8 or so), and keep your camera focused at infinity. Unless the fish are very close, that should work well.

Materials needed:

  • One shower drain
  • One large Aloksak plastic bag
  • 2 feet of aluminum rod
  • 2 small rubber washers
  • a small piece of anti-reflective glass or (preferably) plexi-glass
  • silicone caulking
  • closed cell foam or gasket material (to make sure your lens fits tightly into the drain)
  • Smaller aluminum, bamboo, plastic stick

Tools needed:

  • Hacksaw (for cutting through PVC)
  • File (for smoothing plastic edges and making ridges in the aluminum rods)
  • Pen (for outlining the lens port)
  • Coping saw (for cutting out the circular lens port from the plexi-glass)
  • Utility knife (for cutting foam spacers and the hole in the plastic bag)

I picked up all of this from my local Home Depot, except the Aloksak bag which you can get from an outdoor store (MEC for me).

First, make sure your Aloksak bag is big enough to fit your camera and lens. If it’s not, get a bigger one.
Next, make sure your shower drain has a large enough drain hole to fit over the front end of your lens. (I had to file the threads out of the center of the drain I bought to fit over my Olympus 14-54 lens) It’s ok if it is a little bit bigger, but it can’t be smaller. Everything fits? Excellent – we can now build the bag.


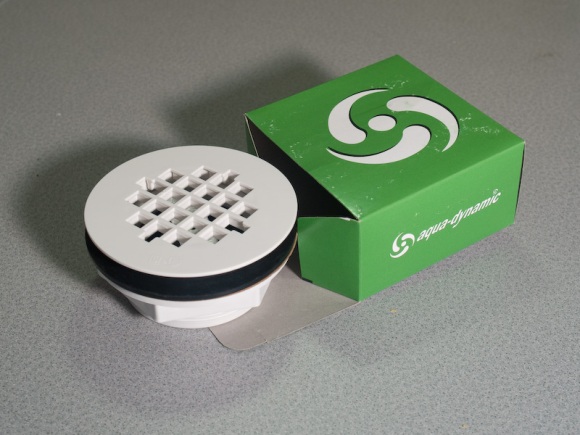
This is the drain as it comes from the store.


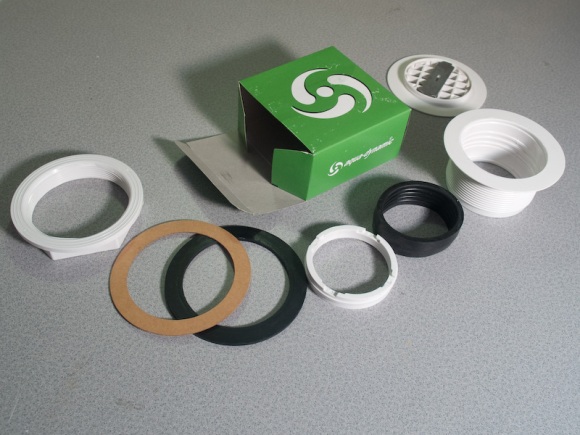
Here is the drain completely disassembled. The parts we are going to use are the two large plastic pieces that thread together, the black rubber washer and the cardboard washer. Save the rest for a rainy day or throw it out.


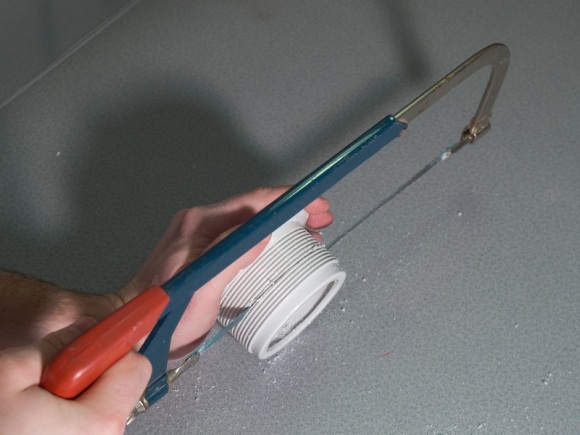
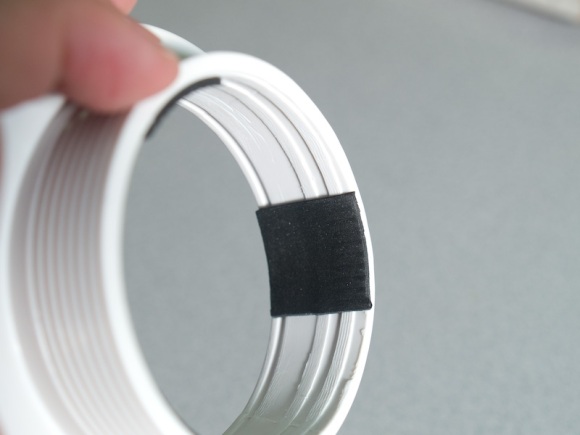
This particular drain had a small lip on the bottom that the lens couldn’t fit through, so I cut that off. Do whatever cutting or filing you need to so that the lens fits. Make sure to leave some of the threading.


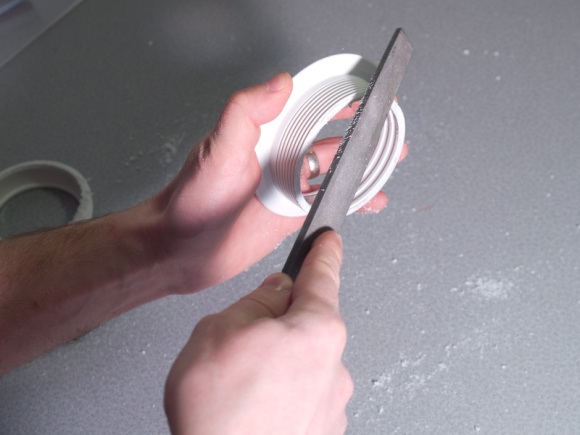
Sawing the plastic left some burrs, so I smoothed them out. File down any sharp edges. Assemble the pieces to make sure everything continues to fit together smoothly and securely.


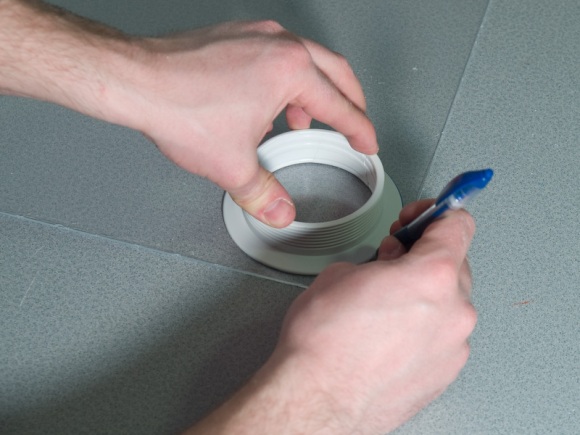
The lens port needs to cover the entire front of the drain, including the flange. Trace out the drain cover on the protective plastic film of the plexi-glass.


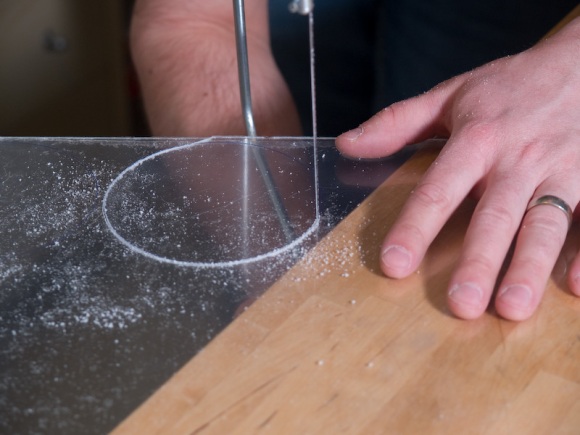
This was the trickiest point. At one point I put too much pressure on the saw and cracked the plexi-glass. Of course, I had a huge sheet so lots of room for error. Make sure you don’t put too much pressure on the saw while you’re cutting and cut out the circle (with the protective film still in place).


Back to the drain. I wanted to make sure the cover fit securely on the lens to keep the plastic parrallel to the front element, and the keep the camera from floating around inside the bag. Use closed cell foam or gasket material (depending on the thickness you need) to friction fit the lens inside the drain. You don’t want to put too much pressure on the lens, but you do need the shower drain to be secure. Experiment until you are happy with the fit.


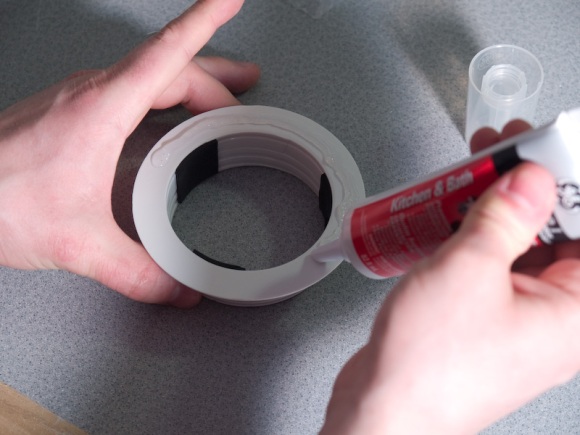
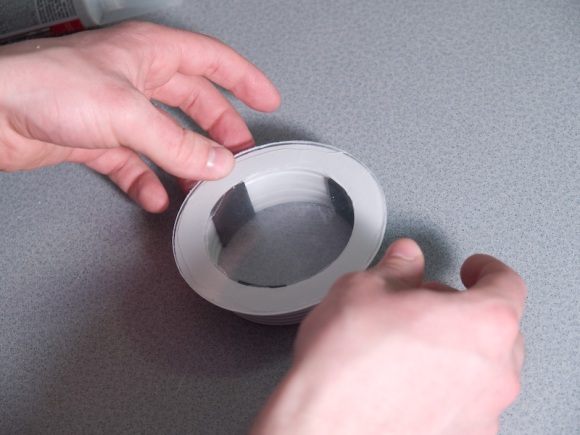
Now you need to secure the plexiglass to the drain with a watertight seal. Silcone the flange of the drain, making sure to get a continuous bead all the way around. Push the plexi-glass against the drain, lining up the edges. You should not have any gaps or air bubbles. You also don’t want so much silicone that it squeezes out everywhere, especially inside the drain as that can impact the optical quality. Outside can be cleaned up with the utility knife. The flange is probably big enough that you can get a good seal without excess silicone.


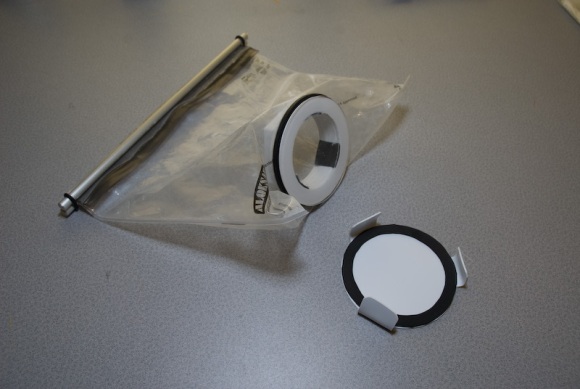
The lens port fully assembled. Wait for the silicone to dry before putting any stress on it.

Cut a hole in one side of the Aloksak bag, just large enough for the small end of the drain to fit through. I put the hole in centre of the bottom. That made the seal on the bag block the viewfinder. Learn from my mistakes.


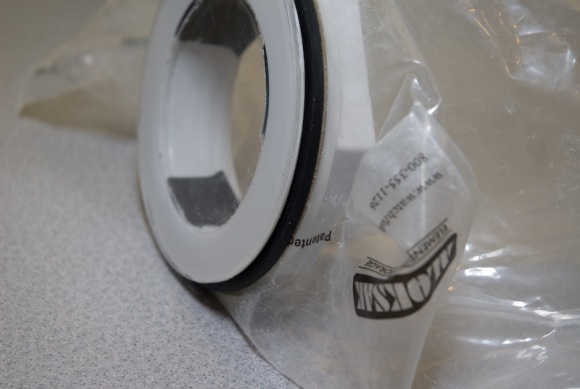
Put the drain (plexi-glass side down) on the table. Put the rubber gasket on, then slip the Aloksak bag over the drain threads so that the threads protrude into the bag (see picture). Reach inside the bag, put on the cardboard washer (or whatever second gasket you might have) and thread on the final part of the drain (this part the didn’t require any modifications). Make sure this is tight! The bag will be pinched between the two washers, and the whole thing secured by the threads of the drain.

Put your camera in the bag and seal the zipper, taking out most of the air. More air means it will be harder to keep the camera underwater. A little bit of air might slow its descent if you drop it (this did not get tested).

You now have a waterproof camera bag. While I was very confident in the water-tightness of the lens port and bag, the zipper on the bag is not particularly strong (Aloksak bags are Navy rated and supposed to be waterproof, but this is my camera we’re talking about.)


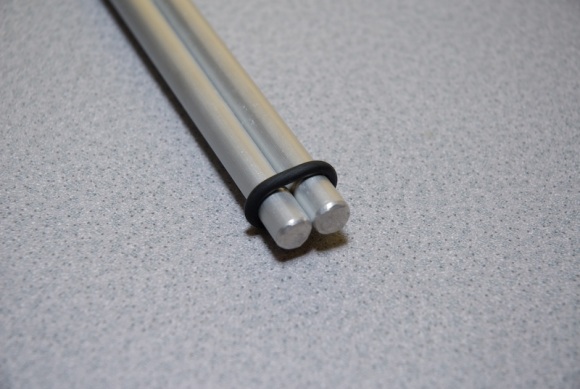
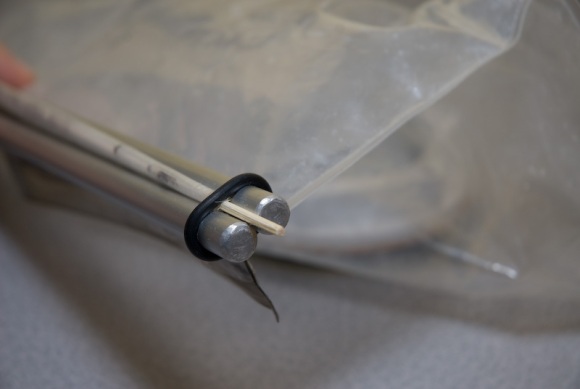
To make sure the seal on the bag wouldn’t open, particularly due the pressure of holding the bag, I cut two pieces of aluminum rods about 1″ longer than the length of the bag seal. I used the file to make a groove .5″ in from each end of the rods, so that a rubber washer could be cradled in it and hold the rods together extremely tightly.


Once your camera is in the bag and the zipper is sealed, fold the end of the Aloksak on itself. Slide the folded edge between the two pieces of aluminum rod so that the fold is on one side and the zipper and camera are on the other. Slip the rubber washers over the ends of the aluminum rods, then slip the thin dowel through the fold.


Now you’re ready to go snorkelling with your SLR. Have fun!

Oh, and just to give you an early warning system if you do have a leak, put an alka-seltzer tablet in the bag with your camera. If water gets in the bag, the tablet will foam up, and you’ll know right away to surface and protect your equipment.

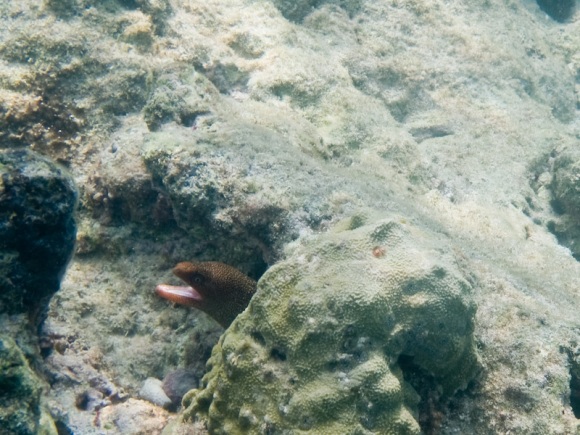
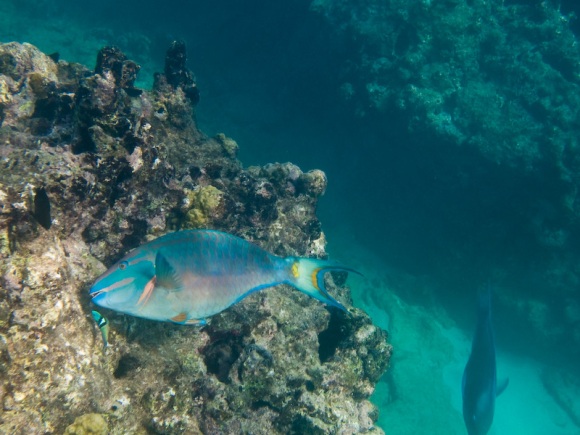
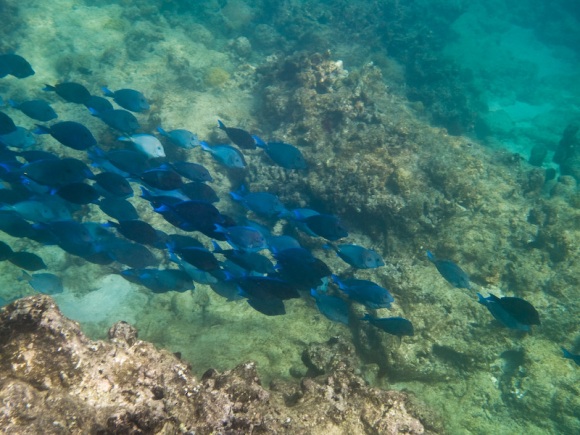
Here are a few photos I got with this setup:


To see where we went snorkeling and some more pictures, see http://travelsandtrails.com/place.php?place_id=98.

Note: This worked for me. I take no responsibility for any ruined SLR cameras out there. For the love of SLRs, test it in the bathtub first.
Raw vs Jpeg

When I first got my digital SLR, I set it to take the highest quality JPEG photos. I had read a lot in the DP Review forums about raw and jpeg and, for my camera in particular, a lot of people said that the jpegs that came out of the camera were really good, and if you’re crazy and want a lot of extra work, you might be able to sqeeze a little more quality out of the raw format. It kind of made sense to use jpeg – with raw you have to process every single photo you want to print, post online, or do anything with. The other thing is that raw takes so much space on a memory card compared to jpeg.

So for a long time, I only shot with jpeg. I was very pleased with my photos, especially compared to my old point-and-shoot. I sometimes did adjustments to lighten or darken areas of my pictures, or add more saturation here or there. You can only do so much before you start to notice a lot more grain, or loss of detail. Some things you just can’t fix – like blown (completely white) skies.

I’m not sure what prompted me to finally try raw. Maybe I was just feeling adventurous that day. Anyway, I set my camera to raw, and of course it makes no real difference when shooting. When I got home, and transferred the images to my computer, it took a lot longer. When I took my first look at the pictures I was disappointed. They were okay, but not great – my foray into raw didn’t leave me impressed. They all seemed too dark, or too light, and all of them seemed pretty flat. The next morning I looked at the pictures again, and I thought I’d see what I could do with them in Photoshop (I didn’t really know about Adobe Camera Raw at that point). When they opened in ACR I tried fiddling with some of the settings. This is when a whole new world opened before me (okay that’s a little over-dramatic). The range of developing I could do without any loss in quality amazed me. I could get detail out of areas that looked black. I could get blues out of overexposed skies. Raw is no substitute for properly exposing photos of course, but when there is a large difference between the exposures for different parts of the image, raw can help immensely.

So I was impressed, but there’s still the problem of editing any photo you’re interested in in ACR or other software. However, now that I’m using Adobe Lightroom it is very easy. You can batch develop photos you import, and it’s very easy to switch between viewing all your pictures and making a few quick adjustments.

With the right software, raw is definitely the way to go. You get more dynamic range in your photos, and adjustments don’t cause any loss of image quality. Files are significantly larger than jpeg, so you do have to have larger memory cards and hard drives, but the difference in quality of the final image is easily worth any extra hassle.

Thoughts on Purchasing an SLR Camera

(…or why I like my Olympus E-1)

There are a million and one cameras out there, and picking a camera to buy can be really exciting and a little scary. It’s hard to know what you want or need, and if you will be happy with your camera and the pictures that come out of it. So to possibly help (or possibly complicate) the process of buying a new camera, I’m going to post my ideas and experience on what makes a good camera. Since I use an SLR camera, I’m going to focus on those, but a lot of this could apply to any kind of camera. (although SLRs provide better image quality and more flexibility than most other cameras)

The camera is simply a tool to capture images, and while this is its only function, a lot of factors come into this.

  • Do you want to be seen carrying it around?

    If you don’t have your camera with you, you can’t take pictures. So how it looks is important.

  • Is is comfortable to hold and carry around?

    Weight and ergonomics are important factors, and can make a big difference when you see that animal on the trail, but your hand was cramping trying to carry the camera, so now you have to dig it out of your pack.

  • Can you get at advanced settings quickly? Do you use them?

    If you change the shutter speed often to capture silky waterfalls, or change the aperture to blur the background, can you change these easily? If you’re shooting a snowy winter scene, can you set the exposure compensation in 2 seconds before your friend skis by you? On the other hand, maybe you hate settings, maybe you always want automatic. Then you should make sure the camera has a great automatic mode (most do these days), and don’t worry too much about access to settings. But beware – you learn as you take pictures and one day you might find yourself wishing you could just change one little thing to get a better picture.

  • What about bad weather?

    Some of the best pictures are taken in bad weather. Spectacular storms, rainbows, and heavy snow can make a good picture great. Do you want to be worried about getting your camera wet or cold? Do you want to shoot from under an umbrella or with a plastic bag over your camera?

  • But I just want amazing pictures with not much effort.

    You will get some. Cameras take good quality photos these days – any camera will. There are some color differences, some capture a little more detail than others, and some have less noise at high iso settings, but most cameras will take pretty good pictures. The main challenge now is getting us to take good pictures, and that sometimes takes effort. I’m always amused when someone sees a great picture and they say, “Wow, you must have a good camera.” Honestly, that hardly matters.


The store salesperson will inform you about megapixels, ISO 1600 shots with no noise, and any other latest whiz-bang (does that date me?) technology a new camera might have. These are things that can be measured, and are easy to spout off without knowing a lot about photography. I believe these should be at the bottom of the list of things you care about when buying a camera. So what should be at the top? That all depends on how you use it.

  • Do you take landscape photos that you want make 3 foot prints of?

    Then you do want lots of megapixels. The more you have, the more detailed your print may be. I say may, because as the number of megapixels goes up, the level of detail doesn’t exactly correspond. It will generally go up to, but the sensor has many factors other than pixel count that affect the amount of detail it can capture. Don’t expect to get much more detail with a 10 megapixel point and shoot than a five megapixel SLR. Why? Because the sensor on the SLR is much larger.

  • Do you want to take pictures of sports games or birds (or your kids who never stop moving)?

    Well, you’re going to need fast autofocus, and long zoom lenses, and you might even want image stabilization. If you can’t focus on a bird before it disappears behind a tree, you’ve lost the shot. And if the bird is just a speck in the distance anyway, does it matter if you get the shot? Long lenses are expensive – can you afford one that will give you decent image quality?

  • Do you want pictures your friend’s band playing at the pub?

    Then low noise at high ISOs might be important to you so your shutter speed can be fast enough so not everything is blurred. You will also want lenses with a large aperture (or low f-stop). Lenses that let in a lot of light are much more expensive.

  • Do you want to take your camera kayaking, rock climbing, hiking, and other places it will be abused?

    This is my category. I don’t ever want to worry about if my camera is safe. I don’t want to worry about it getting wet. I just want it to be there whenever I want it, to get the shot I want. For this you want at least a water resistant camera, if not waterproof. You want something that’s not plastic, so if hits something, the most you’ll get is a ding or a scrape. You want a small camera, so you won’t get sick of carrying around.


I now have the Olympus E-1, which is an old digital SLR. No salesperson would ever try to sell it to you. Its only five megapixels, and Olympus will have a replacement for it this summer. But there are very few cameras out there right now that I would want more than this one, even if I had the money to buy anything.

The settings in the olympus are easy to change. There is a button for almost anything, and you rarely have to change any settings on the LCD. You want to change the exposure compensation – press the button and turn the wheel. You want to change the focus point – press the button and turn the wheel. The ISO – press the button and turn the wheel. Set the timer, change the bracketing settings, its all the same. This makes it very quick to set up for any situation. Now on some cameras, you don’t have to turn the wheel – you just press the button. The problem with this is that it can happen by bumping the camera, so your next few shots might be ruined until you realize you’re using the wrong settings.

The E-1 is water-resistant (and has lots of water resistant lenses for it). People have dropped their E-1s in puddles, they’ve washed them off under the sink when they get dirty. Of course Olympus doesn’t recommend this, but the camera seems to be able to handle a lot. I have taken it through everything from afternoon drizzles to all day jungle downpours. It just always works, and I don’t have to worry about it. It has a metal body, which is really durable. I haven’t exactly dropped it on rocks yet, but I’ve knocked it around a lot, and I’m fully expecting to abuse it more in the future. I want my camera to be able to handle that.

It is also easy to carry around. The E-1 has a large grip which my hand fits into very well. I can carry it in my hand all day and not get tired of holding it. I’m not scared of dropping it because of the rubber grip and the contours of the body that naturally keep it in my hand.

One part I haven’t touched on much yet, which is one of the most important parts is lenses. This will only apply to SLRs. If you buy a camera body, you will probably want to replace it in a year or two. Lenses rarely get outdated like this. Usually, you build up a collection of lenses for one brand, and replace your camera body with the same brand, so it fits all your lenses. So half of your decision to buy a camera should be based on whether that system has lenses you like or not. Generally, spending money on lenses is more important than spending money on your camera. They are much more of a sound investment, and will have a huge effect on the quality of the pictures you take. So I like Olympus in this regard because they have weather-sealed lenses, I can get a zoom range of 28mm to 400mm with only two (very good quality) lenses, both f2.8-3.5 over their zoom range, which is very good. These are also not massive lenses, so they are easy to take on hikes. I don’t want a massive camera bag to lug around with me everywhere.

Size is the one area where I’m not totally happy with the E-1 – it’s pretty big. Now the lenses more than make up for that (compared to other SLR lenses), but I do wish the E-1 was a little smaller. However, I’m not willing to give up good ergonomics for a smaller, lighter body (which would be the case for the Canon Digital Rebel). Olympus does have the E-410, which is a really good, and very small SLR. However, I’m not willing to give up the E-1’s weather-sealed body.

So we finally come to megapixels. The E-1 has only five. That’s old, outdated, and not up to industry standard (which makes it really inexpensive, especially on ebay). But wait a minute. I can print 16″ x 20″ prints that look great. The full size photos are larger than your computer monitor. Why do I need more megapixels? There are possible answers to that question. If I want to print larger or sell photos to stock photo agencies I may need more megapixels. But 5 megapixel images have graced full page spreads in National Geographic. More than likely, you won’t be limited by five megapixels. Sure, I’d take more if all things were equal, but they’re not equal and frankly megapixels are not that important.


Although you need to be comfortable working with your camera body, you need a lot more than a camera body to get good pictures. You need a tripod, you need the right lenses, and most of all you need skill and creativity. Honestly, you will probably be happy with whatever camera you buy, and no matter what you get, it will probably take great pictures. I just want to counteract the salespitch you will likely get at the store, and which has almost nothing to do with taking pictures.