A Breath of Fresh Air

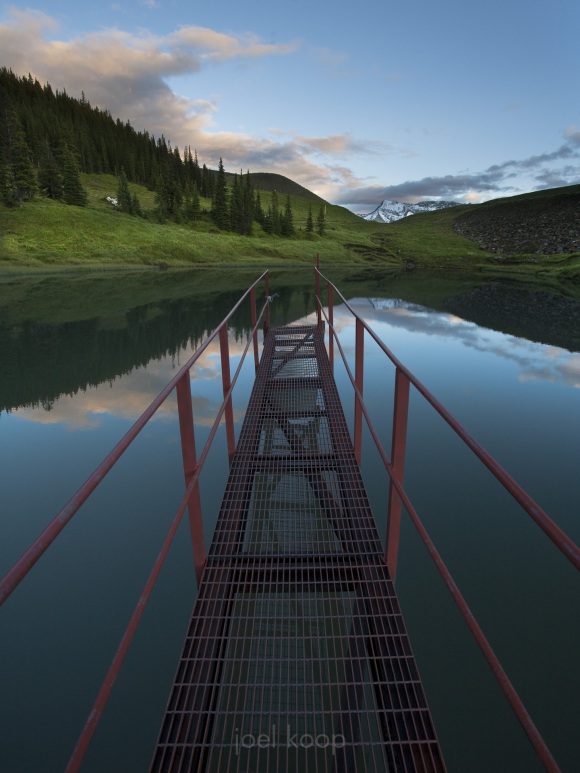
Lately there’s been a lot of filling out forms, delivering prints, setting up and taking down displays, and just way too much business stuff in general. I was starting to get tired of it all and questioning this whole photography thing. Then on Wednesday I got the chance to take the day and drive out to Cadomin. Spending the day alone in a beautiful and fascinating place, for me, cures a multitude of ills. This is what I signed up for, and what I love.


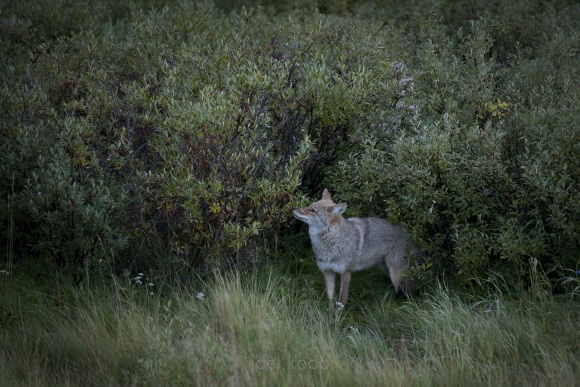
This coyote was fun to watch. I first saw him tearing around throwing something in the air and snapping at it. I assumed he’d caught some supper, but it turned out to be a scrap of paper he was playing with. In the middle of his racing around, he stopped for a few seconds, looked at me, smelled the bush next to him, and then took off as fast as he could go. My favorite capture was this one – a peaceful moment in the middle of an energetic playtime.

Lens Changes

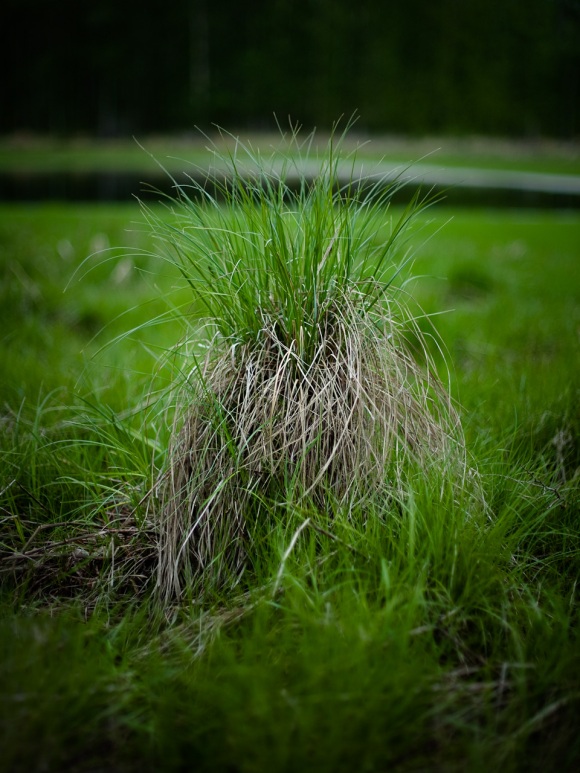
While my photo compositions and perspectives change slowly over time, lens changes transform my pictures overnight. I recently switched over to a camera system with a larger sensor, and currently only have money for prime lenses. This has taken a bit of getting used to, and limits my photography in some ways, but it has also provided opportunities I’ve never had before. Cue the shallow depth of field landscapes!

Lying and Cheating

If you’re not editing your photos, you’re lazy or misguided. There – I said it.

I’m tired of people claiming “purity of image” or “truth” in an unedited photo. The moment you take a picture you are interpreting the scene – if you’re trying for truth, you’re a long way off. You choose the framing, you choose the lighting (yes even in natural light), you choose the angle, and you choose which pictures you show to people. If you’re a photographer, you are already interpreting – just possibly not enough to make any point.

If you don’t think you are interpreting a scene, I would like to hear from you. What are you doing? You are already limiting my view to a tiny window, and taking away all my other senses.

If you are trying to interpret a scene, why would you stop editing the moment it leaves your camera? You’re missing out on an opportunity to share your perspective. You could get rid of distracting elements that take away from your idea. You could add distracting elements if obfuscation is your goal. You think you made a perfect image that perfectly conveys your perspective? Possible, but chances are it could be clear, more compelling, and possibly more truthful – and you’re too lazy to do it. It is not cheating to use a different medium in a work of art.

Whether the point you are making is representing something truthful or not is a completely separate issue, and a hard one for many photographers. It depends a lot on the kind of photography you do. This has been a very hard question for me to answer in the past but its getting easier: I’m leaning more and more towards this not mattering. I am not seeking to represent truth. I’m seeking to represent beauty, loneliness, verdant life, desolation, quietness, grandeur – the list goes on and on. I’m not sure truth is something even to be considered in art photography. I’m more interested in the way the eye moves across a photo, the emotional responses it evokes, and the interplay of light and subject. I’m even occasionally interested in an analytical response.

If you dislike editing, fair enough. There are things you can do in the camera to create great photos, and many great photographers have done little post processing (although this is more rare than you might think). But to take an image that almost says something, and to not give it that final push is criminal. I’ve seen too many almost good photos in my life. Why would putting work into a piece of art be looked down upon? I can’t understand this.

So please edit your photos. I would like to see your perspective on life and truth. Some people will hate you for it, but I will be eternally grateful.

ps. For the record – I don’t do much editing on my photos, but I think I’m going to start to do more. I’m trying not to be so lazy myself.

Alternatives

For the past couple years I’ve been doing all my photography, web development, and everything else on a Macbook Pro. It’s a nice computer. Only occasionally locks up. Does everything pretty seamlessly, almost never gets in the way. There seems to be a lot less maintenance then when I had a windows computer. Overall, I enjoy it quite a bit, but…

Every once in a while I catch myself looking wistfully at shiny new motherboards, processors, graphics cards and cases. I remember assembling them all into a modular beauty. I can picture a black screen with a command prompt and a blinking cursor. Customizing a kernel module was a frustrating and wonderful thing at the same time. Sometimes I’m really tempted to go back to linux.

So it makes sense for a programmer to use linux, maybe even a web developer, but a professional photographer? Yeah, I dismissed it as ridiculous for a while. But one day I stumbled across Bibble. Hmmm, a raw developer that works on linux. Sure there’s always been dcraw, but for managing a catalog of thousands of raw files, that really is not going to work. But Bibble is interesting. I tried a preview of version 5 on my mac, and honestly I liked the results a bit better than out of Lightroom. But here’s the problem: version 4 doesn’t support my camera, and version 5 was supposed to be out about 2 years ago – and it’s still not done. That makes me wonder about future support.

So I’m still looking wistfully at those computer parts and dreaming of linux. Don’t ask me why – I’m not missing anything on my Mac. Maybe I’m a bit sentimental.

First in a Series of Self-Critiques


This post is the first in a series of photo critiques I plan on doing with my own pictures. My goals for this are to improve my photography by conscious analysis and to give other photographers ideas for creating better images. I’m sure I’ve missed a lot in my analysis, and I welcome any questions, comments, corrections or additions.

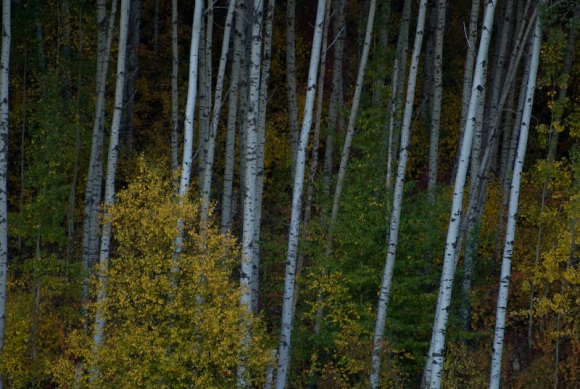
Here is a recent picture of a poplar forest after sunset at Chickakoo Lake. It was taken at a focal length of 300mm at f5.6. The shutter speed was only 1/80 of a second, so I used a tripod and mirror lockup to get a sharp picture. This is the original with only some white balance corrections applied to the raw file:

What works:
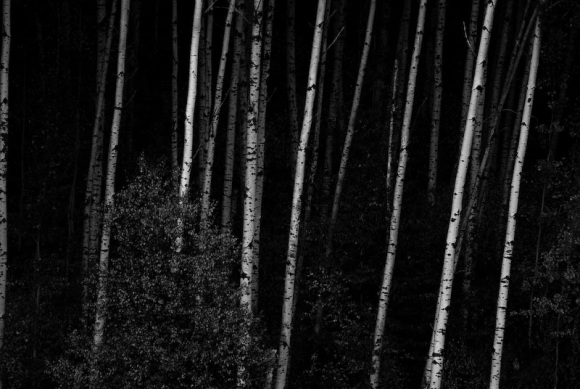
My aim is for the photo to be simple and striking, evoking a sense of quiet unknown. The main, almost only, element in the photo is the repeating tree trunks disappearing into the forest. The narrow field of view from the 300mm lens helps crop out distracting elements: the sky, the treetops, the underbrush.

I kept the leafy tree in the bottom left. It does break up the repeating tree trunks, but works to stop some of the strongest lines in the image from dropping off the bottom edge. Instead the viewer’s eye gets briefly trapped in the subtle detail of the leaves before being snapped back to the high contrast tree trunks.

1. Compression – I used a 300mm telephoto lens. One of the effects of a telephoto lens is to compress the foreground and background into a single plane. There is no vanishing point: parallel lines do not converge. This makes the picture look flat – things that are actually separated by a lot of space appear to be right next to each other.
2. Depth – The evening light highlights the first few trunks of the poplar trees. These are very high contrast and grab the eye quickly, even if you just glance at the photo. Deeper into the forest, the trunks are darker, but still visible. This adds a subtlety and depth that can draw the eye in and hold it longer. There’s a sense of mystery as the forest is only partially revealed.

I find it interesting to play with depth through color and contrast in an image which has very little depth from foreshortening. Extreme wide angle is very popular for landscape photographers these days, and it often works very well, but good landscape photos are also possible at telephoto focal lengths and are a little more unusual.

What doesn’t:
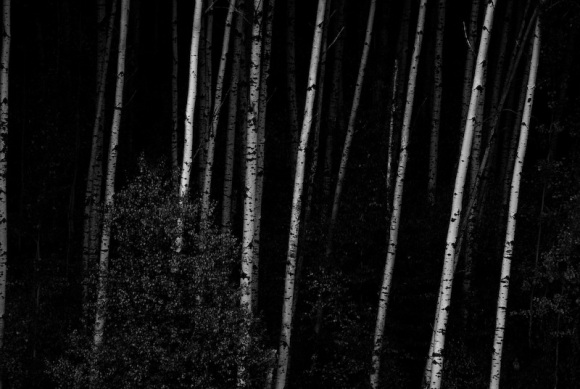
I don’t particularly like the original colors in this image. The soft yellows, greens, and pinks take away from the high contrast, mysterious effect. They could be useful for a different goal, but I really like the dark brooding forest of the edited version. So I played with the curves a little bit to add contrast and converted to black and white. I can’t quite decide if the contrast is too strong now. Are there too few details left in the background?

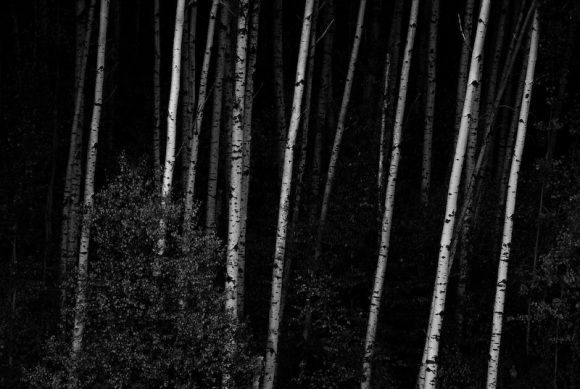
On the left edge of the image is a dimly lit tree trunk beside a large dark area. I find that tree distracting. I may crop out the tree to give the image a little more balance, but it’s too bad because I really like that large dark void.

Making an Underwater Camera Bag

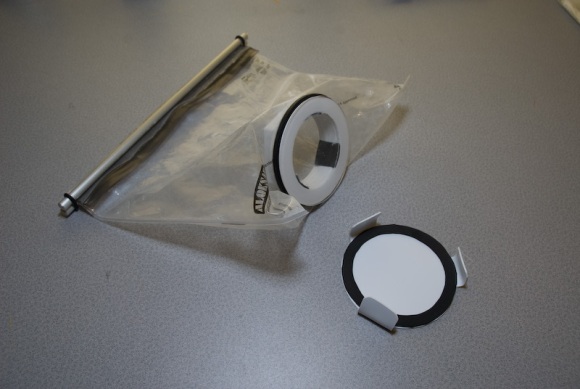
We were going on holiday to Barbados and going to be snorkeling for the first time. How could I not try to get pictures of that? Two problems: the price of a professional underwater camera bag, and the quality of underwater point-and-shoots. So we compromised and designed a flexible underwater casing for my Olympus E1. This design can be customized to fit almost any SLR.

Once you have the materials, this underwater bag takes a few hours to assemble. I used this bag in the ocean at depths up to about 10 feet, and it never let any water in.
The upsides:

  • The camera stayed dry and safe.
  • I got to take high-resolution underwater pictures.
  • I didn’t have to pay the cost of another SLR to get the casing.
  • The casing is relatively compact.

The downsides:

  • It is hard to change the settings once the camera is in the bag, so I had to do some trial-and-error and guessing to set up the shot.
  • Autofocus was a bit spotty, but that might depend on the camera.
  • The design does not (yet) include a strap or ergonomic handle. It took a while to get used to holding it, and given its size restricts your movements somewhat.

In general, you want as bright of a day as possible, and you’ll probably still need to raise your ISO to at least 200 or maybe 400 to get blur-free shots. Autofocus worked alright, but it is very hard to look through the viewfinder. If you have a camera with autofocus in liveview, this should work much better. I usually ended up pointing the camera in the general direction of interesting stuff, taking a bunch of pictures, and going through them after to find the good ones. If you find your autofocus a little unreliable, it may work best to use a wide angle lens, keep your aperture fairly high (f8 or so), and keep your camera focused at infinity. Unless the fish are very close, that should work well.

Materials needed:

  • One shower drain
  • One large Aloksak plastic bag
  • 2 feet of aluminum rod
  • 2 small rubber washers
  • a small piece of anti-reflective glass or (preferably) plexi-glass
  • silicone caulking
  • closed cell foam or gasket material (to make sure your lens fits tightly into the drain)
  • Smaller aluminum, bamboo, plastic stick

Tools needed:

  • Hacksaw (for cutting through PVC)
  • File (for smoothing plastic edges and making ridges in the aluminum rods)
  • Pen (for outlining the lens port)
  • Coping saw (for cutting out the circular lens port from the plexi-glass)
  • Utility knife (for cutting foam spacers and the hole in the plastic bag)

I picked up all of this from my local Home Depot, except the Aloksak bag which you can get from an outdoor store (MEC for me).

First, make sure your Aloksak bag is big enough to fit your camera and lens. If it’s not, get a bigger one.
Next, make sure your shower drain has a large enough drain hole to fit over the front end of your lens. (I had to file the threads out of the center of the drain I bought to fit over my Olympus 14-54 lens) It’s ok if it is a little bit bigger, but it can’t be smaller. Everything fits? Excellent – we can now build the bag.


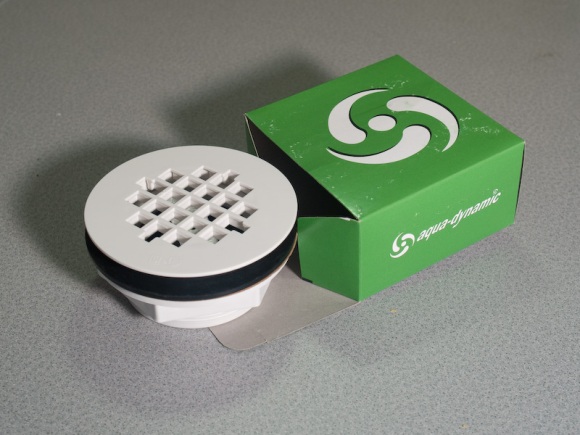
This is the drain as it comes from the store.


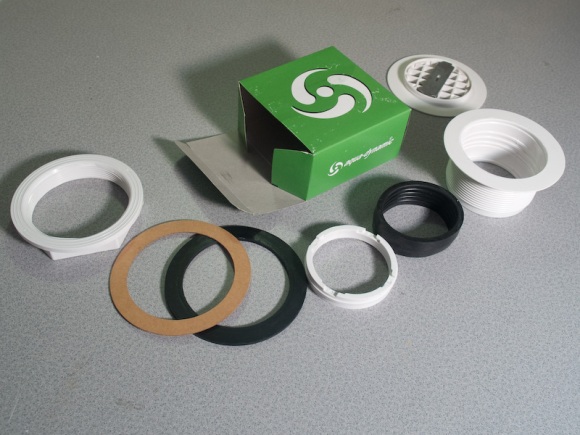
Here is the drain completely disassembled. The parts we are going to use are the two large plastic pieces that thread together, the black rubber washer and the cardboard washer. Save the rest for a rainy day or throw it out.


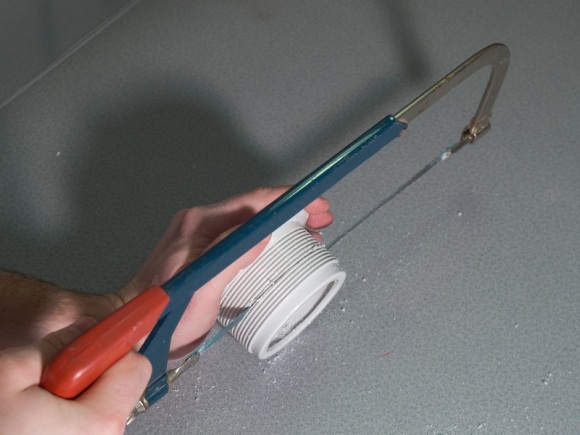
This particular drain had a small lip on the bottom that the lens couldn’t fit through, so I cut that off. Do whatever cutting or filing you need to so that the lens fits. Make sure to leave some of the threading.


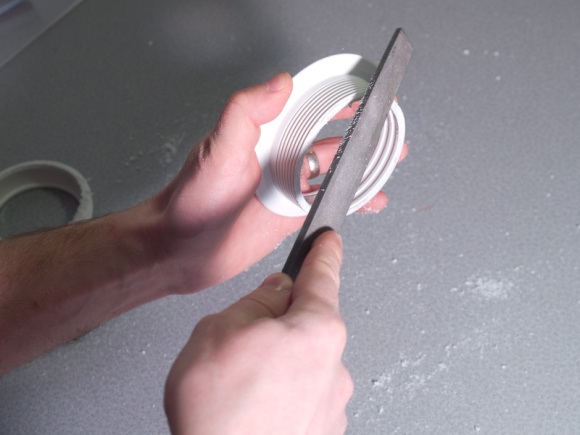
Sawing the plastic left some burrs, so I smoothed them out. File down any sharp edges. Assemble the pieces to make sure everything continues to fit together smoothly and securely.


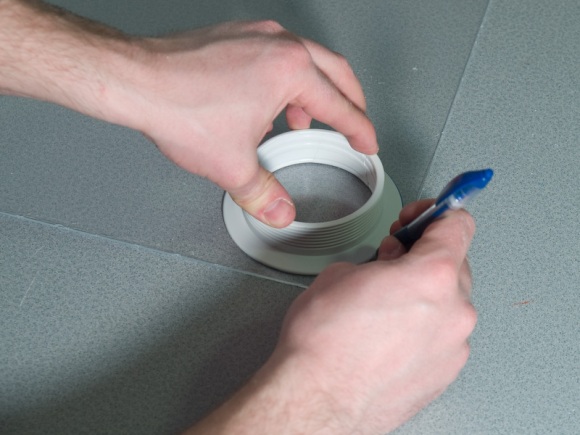
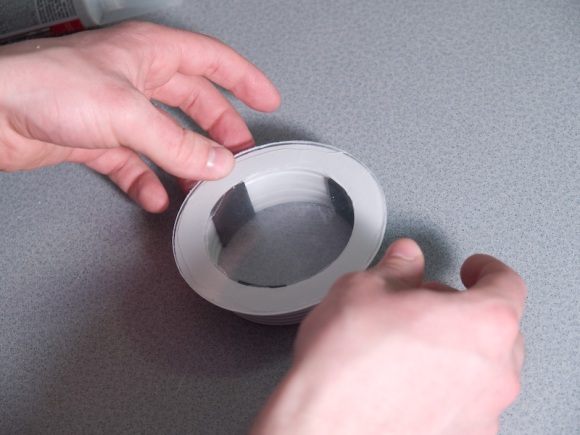
The lens port needs to cover the entire front of the drain, including the flange. Trace out the drain cover on the protective plastic film of the plexi-glass.


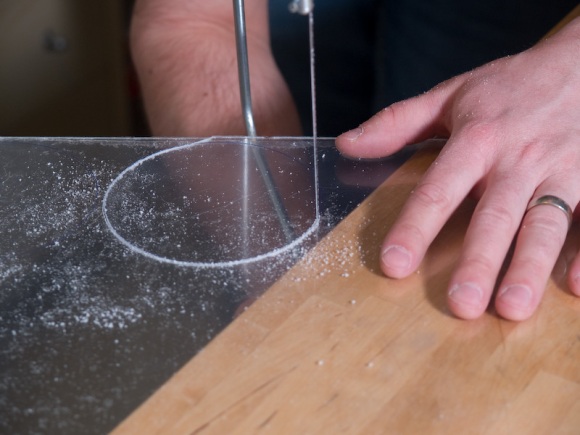
This was the trickiest point. At one point I put too much pressure on the saw and cracked the plexi-glass. Of course, I had a huge sheet so lots of room for error. Make sure you don’t put too much pressure on the saw while you’re cutting and cut out the circle (with the protective film still in place).


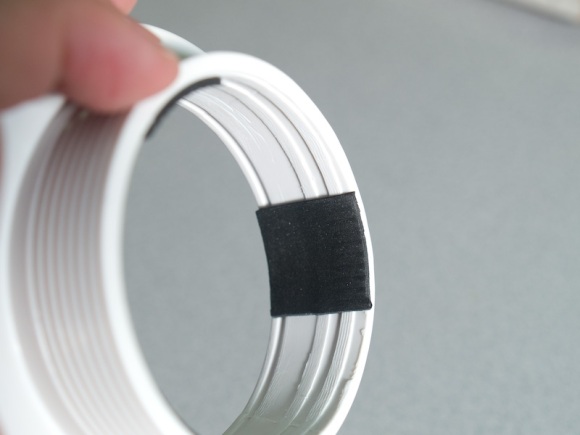
Back to the drain. I wanted to make sure the cover fit securely on the lens to keep the plastic parrallel to the front element, and the keep the camera from floating around inside the bag. Use closed cell foam or gasket material (depending on the thickness you need) to friction fit the lens inside the drain. You don’t want to put too much pressure on the lens, but you do need the shower drain to be secure. Experiment until you are happy with the fit.


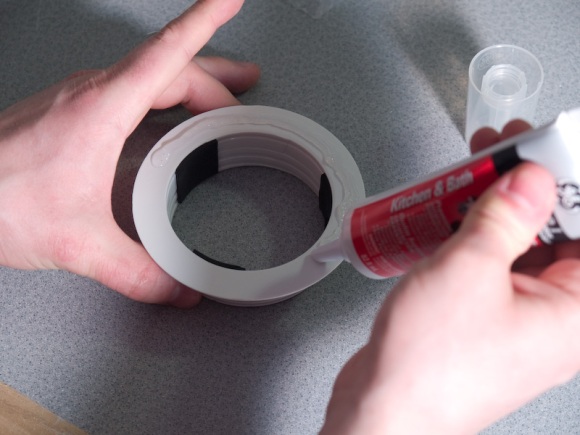
Now you need to secure the plexiglass to the drain with a watertight seal. Silcone the flange of the drain, making sure to get a continuous bead all the way around. Push the plexi-glass against the drain, lining up the edges. You should not have any gaps or air bubbles. You also don’t want so much silicone that it squeezes out everywhere, especially inside the drain as that can impact the optical quality. Outside can be cleaned up with the utility knife. The flange is probably big enough that you can get a good seal without excess silicone.


The lens port fully assembled. Wait for the silicone to dry before putting any stress on it.

Cut a hole in one side of the Aloksak bag, just large enough for the small end of the drain to fit through. I put the hole in centre of the bottom. That made the seal on the bag block the viewfinder. Learn from my mistakes.


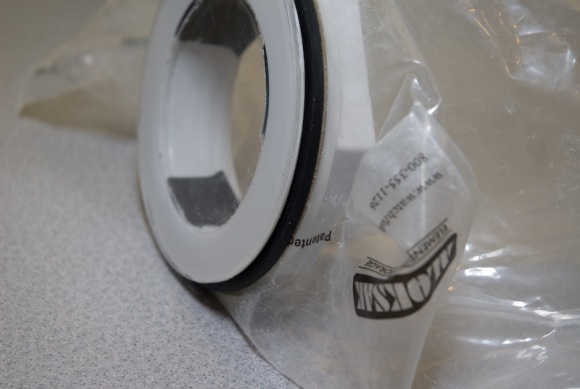
Put the drain (plexi-glass side down) on the table. Put the rubber gasket on, then slip the Aloksak bag over the drain threads so that the threads protrude into the bag (see picture). Reach inside the bag, put on the cardboard washer (or whatever second gasket you might have) and thread on the final part of the drain (this part the didn’t require any modifications). Make sure this is tight! The bag will be pinched between the two washers, and the whole thing secured by the threads of the drain.

Put your camera in the bag and seal the zipper, taking out most of the air. More air means it will be harder to keep the camera underwater. A little bit of air might slow its descent if you drop it (this did not get tested).

You now have a waterproof camera bag. While I was very confident in the water-tightness of the lens port and bag, the zipper on the bag is not particularly strong (Aloksak bags are Navy rated and supposed to be waterproof, but this is my camera we’re talking about.)


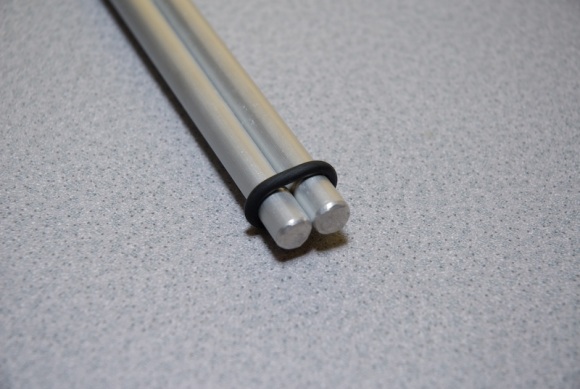
To make sure the seal on the bag wouldn’t open, particularly due the pressure of holding the bag, I cut two pieces of aluminum rods about 1″ longer than the length of the bag seal. I used the file to make a groove .5″ in from each end of the rods, so that a rubber washer could be cradled in it and hold the rods together extremely tightly.


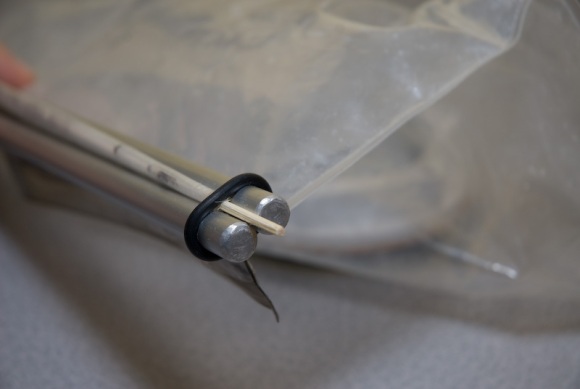
Once your camera is in the bag and the zipper is sealed, fold the end of the Aloksak on itself. Slide the folded edge between the two pieces of aluminum rod so that the fold is on one side and the zipper and camera are on the other. Slip the rubber washers over the ends of the aluminum rods, then slip the thin dowel through the fold.


Now you’re ready to go snorkelling with your SLR. Have fun!

Oh, and just to give you an early warning system if you do have a leak, put an alka-seltzer tablet in the bag with your camera. If water gets in the bag, the tablet will foam up, and you’ll know right away to surface and protect your equipment.

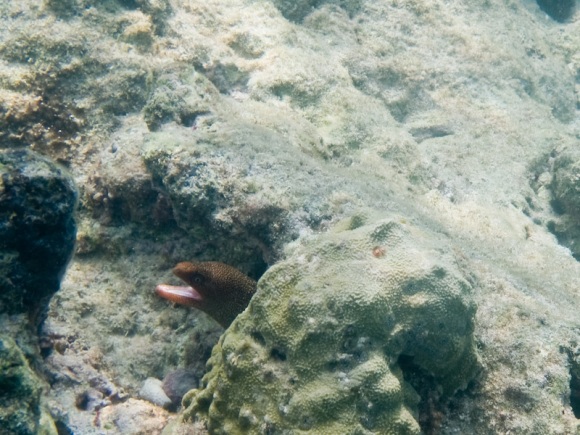
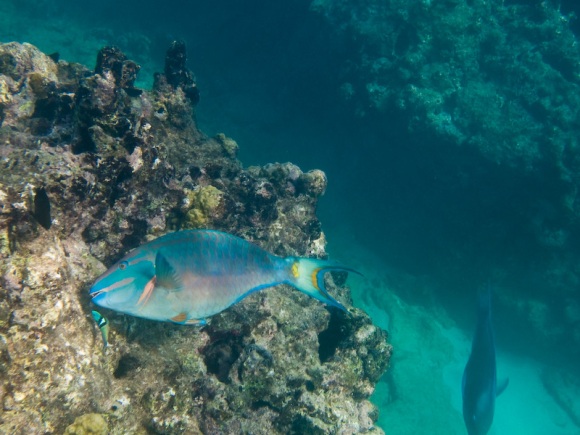
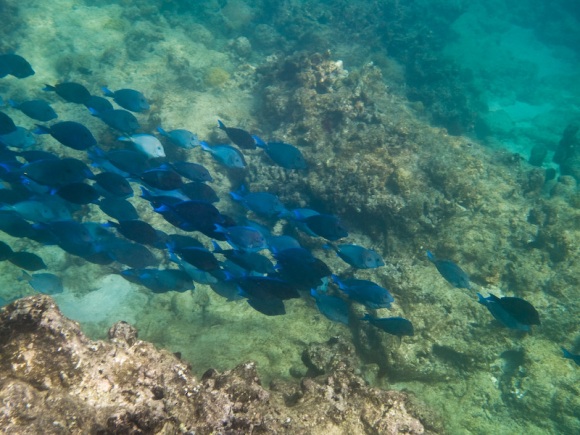
Here are a few photos I got with this setup:


To see where we went snorkeling and some more pictures, see http://travelsandtrails.com/place.php?place_id=98.

Note: This worked for me. I take no responsibility for any ruined SLR cameras out there. For the love of SLRs, test it in the bathtub first.
Raw vs Jpeg

When I first got my digital SLR, I set it to take the highest quality JPEG photos. I had read a lot in the DP Review forums about raw and jpeg and, for my camera in particular, a lot of people said that the jpegs that came out of the camera were really good, and if you’re crazy and want a lot of extra work, you might be able to sqeeze a little more quality out of the raw format. It kind of made sense to use jpeg – with raw you have to process every single photo you want to print, post online, or do anything with. The other thing is that raw takes so much space on a memory card compared to jpeg.

So for a long time, I only shot with jpeg. I was very pleased with my photos, especially compared to my old point-and-shoot. I sometimes did adjustments to lighten or darken areas of my pictures, or add more saturation here or there. You can only do so much before you start to notice a lot more grain, or loss of detail. Some things you just can’t fix – like blown (completely white) skies.

I’m not sure what prompted me to finally try raw. Maybe I was just feeling adventurous that day. Anyway, I set my camera to raw, and of course it makes no real difference when shooting. When I got home, and transferred the images to my computer, it took a lot longer. When I took my first look at the pictures I was disappointed. They were okay, but not great – my foray into raw didn’t leave me impressed. They all seemed too dark, or too light, and all of them seemed pretty flat. The next morning I looked at the pictures again, and I thought I’d see what I could do with them in Photoshop (I didn’t really know about Adobe Camera Raw at that point). When they opened in ACR I tried fiddling with some of the settings. This is when a whole new world opened before me (okay that’s a little over-dramatic). The range of developing I could do without any loss in quality amazed me. I could get detail out of areas that looked black. I could get blues out of overexposed skies. Raw is no substitute for properly exposing photos of course, but when there is a large difference between the exposures for different parts of the image, raw can help immensely.

So I was impressed, but there’s still the problem of editing any photo you’re interested in in ACR or other software. However, now that I’m using Adobe Lightroom it is very easy. You can batch develop photos you import, and it’s very easy to switch between viewing all your pictures and making a few quick adjustments.

With the right software, raw is definitely the way to go. You get more dynamic range in your photos, and adjustments don’t cause any loss of image quality. Files are significantly larger than jpeg, so you do have to have larger memory cards and hard drives, but the difference in quality of the final image is easily worth any extra hassle.

What to do with all those photos.

I wanted to like Aperture. I really did. I was getting a laptop so I could take it with me on trips to download photos from my camera. I like apple’s products in general, and I was getting excited about Aperture, so I decided on a Macbook Pro. Apparently Aperture doesn’t run very well on plain old macbooks – the graphics card isn’t good enough. So I lay down the extra cash for the pro, take it home, and start setting everything up. I install the Aperture trial, and start importing my pictures … and continue importing my pictures … for hours … for a couple days. Eventually I switched to Lightroom and I got all set up in a day. Below is a bit of a review.

Speed
Lightroom seems to a little faster and simpler than Aperture, and still does almost (give me stacks!) everything that I would want. With Aperture I would often get the dreaded beachball cursor. Now this is a fast computer – a high-end Macbook Pro (2.33Ghz Core 2 Duo with 2GB ram). This should not happen. But with Lightroom, even browsing my whole collection is fairly speedy, and I rarely get the spinning cursor.


Adjustments
For image editing, Lightroom has very detailed non-destructive adjustments, just like Aperture, but it seems to me that images can be improved dramatically much quicker than aperture by just using the “Basic” controls on the right side. (vibrance is a beautiful control – I don’t think Aperture has an equivalent). I was never able to get results I was really happy with in aperture. In lightroom I can usually do all the color adjustment I want with the white balance controls, “Recovery”, “Fill LIght”, “Blacks” and “Vibrance”. Of course there are lots of more detailed controls for more fine-grained control which is occasionally needed. Cropping, straightening, spotting are all simple and intuitive in both programs.

Stacks
The one thing I miss from Aperture is stacks, which groups a bunch of photos, and only shows the best one of a group. Similar results can be achieved with stars and flags in lightroom, but it’s not the same and it takes a bit more work.
Edit:
Somehow I overlooked this in Lightroom. Both programs have stacks. You can either stack automatically by capture time or you can assign stacks manually.

Display
Aperture is also better for dual monitors, with flexible display settings. Lightroom doesn’t work on dual monitors yet, but the fullscreen mode (press f) in Lightroom is really nice, with the pop-out panels.


Organization
Other than all this, the filtering (to see only the photos you are interested in) is very powerful in both programs. The terminology is different between the programs, but the abilities are very similar. I didn’t really like that everything had to be in projects in Aperture. And a project can’t hold more than 10,000 images, so I can’t fit all my photos into one project. Lightroom’s catalog holds all the photos, and then they are arranged and filtered within that. This hierarchical structure makes a little more sense to me. The Folders in Lightroom are just the folders on your harddrive, and if you rename them, you rename the folders. This seems much more intuitive than Aperture’s projects to me, and if I ever switch to another program, everything is still organized by folder the way I want it.

Storage
The catalog system in Lightroom seems to work fairly well. I’ve got everything on an external hard drive, some of my best in a catalog on my laptop hard drive, and I can merge the changes I make on my laptop catalog back to my external catalog pretty easily. Of course, you can ignore all this and only have one catalog – that’s by far the simplest. Changing the catalog you’re browsing requires a restart of Lightroom, which seems a little dumb to me, but I rarely change catalogs, so this doesn’t affect me too much.

Backup
Aperture has built-in backups with its vault system. Lightroom backs up its catalog every week too, but I don’t store any of my photos in the catalog (although you can) – just all the meta-data. I back up my whole filesystem rather than letting the program backup it’s own package of my images, and I’m much more comfortable with this. This seems to take a lot less disk space too.

In the end, if you have a Mac, you should try them both. Both have 30 day demos, which is great for evaluating. Both programs are around $300 CAD, but if you’re a student you should be able to get either one for just over $100. If you’re stuck on windows, Lightroom is your option, but you also have the free option of Picasa which is much simpler and less powerful, but still not too bad.


Taking or Making Photos

I’ve been thinking a lot lately about taking pictures as compared to making pictures. Now I take a lot of pictures – I enjoy taking pictures. In my design classes, there has been a fair amount of photography, and thinking of photography as both a technical process and an art. In design, generally, you are expected to make pictures: to arrange the world into a state that communicates an idea, and then capture that in a photo. Usually when I take photos for my own enjoyment I’m not making pictures, I’m taking them. For me this is a way of experiencing the world around me, not arranging it to my specifications. This is generally how I approach life in general, – I’m an experiencer, not an arranger. This has a significant effect on the images I produce. Sometimes I’m tempted to think that taking pictures is a lesser art form than making them. I’m not sure this is the case though. Either way you’re capturing a subjective view of the world around you, and all the same composition and color theory principles apply. Your pictures say a lot about your life, whether you experience or create, and either approach can communicate a variety of messages. I think that the result of taking pictures is often un-original, and I think that’s due to the fact that we all experience many of the same things, and in general, life can get boring. So maybe taking and making photos are the same, but what with taking photos, you’re manipulating your life rather than a composition of objects or people in front of your lens. So there’s the challenge – create an interesting life for yourself and you can *take* interesting photos.

Thoughts on Purchasing an SLR Camera

(…or why I like my Olympus E-1)

There are a million and one cameras out there, and picking a camera to buy can be really exciting and a little scary. It’s hard to know what you want or need, and if you will be happy with your camera and the pictures that come out of it. So to possibly help (or possibly complicate) the process of buying a new camera, I’m going to post my ideas and experience on what makes a good camera. Since I use an SLR camera, I’m going to focus on those, but a lot of this could apply to any kind of camera. (although SLRs provide better image quality and more flexibility than most other cameras)

The camera is simply a tool to capture images, and while this is its only function, a lot of factors come into this.

  • Do you want to be seen carrying it around?

    If you don’t have your camera with you, you can’t take pictures. So how it looks is important.

  • Is is comfortable to hold and carry around?

    Weight and ergonomics are important factors, and can make a big difference when you see that animal on the trail, but your hand was cramping trying to carry the camera, so now you have to dig it out of your pack.

  • Can you get at advanced settings quickly? Do you use them?

    If you change the shutter speed often to capture silky waterfalls, or change the aperture to blur the background, can you change these easily? If you’re shooting a snowy winter scene, can you set the exposure compensation in 2 seconds before your friend skis by you? On the other hand, maybe you hate settings, maybe you always want automatic. Then you should make sure the camera has a great automatic mode (most do these days), and don’t worry too much about access to settings. But beware – you learn as you take pictures and one day you might find yourself wishing you could just change one little thing to get a better picture.

  • What about bad weather?

    Some of the best pictures are taken in bad weather. Spectacular storms, rainbows, and heavy snow can make a good picture great. Do you want to be worried about getting your camera wet or cold? Do you want to shoot from under an umbrella or with a plastic bag over your camera?

  • But I just want amazing pictures with not much effort.

    You will get some. Cameras take good quality photos these days – any camera will. There are some color differences, some capture a little more detail than others, and some have less noise at high iso settings, but most cameras will take pretty good pictures. The main challenge now is getting us to take good pictures, and that sometimes takes effort. I’m always amused when someone sees a great picture and they say, “Wow, you must have a good camera.” Honestly, that hardly matters.


The store salesperson will inform you about megapixels, ISO 1600 shots with no noise, and any other latest whiz-bang (does that date me?) technology a new camera might have. These are things that can be measured, and are easy to spout off without knowing a lot about photography. I believe these should be at the bottom of the list of things you care about when buying a camera. So what should be at the top? That all depends on how you use it.

  • Do you take landscape photos that you want make 3 foot prints of?

    Then you do want lots of megapixels. The more you have, the more detailed your print may be. I say may, because as the number of megapixels goes up, the level of detail doesn’t exactly correspond. It will generally go up to, but the sensor has many factors other than pixel count that affect the amount of detail it can capture. Don’t expect to get much more detail with a 10 megapixel point and shoot than a five megapixel SLR. Why? Because the sensor on the SLR is much larger.

  • Do you want to take pictures of sports games or birds (or your kids who never stop moving)?

    Well, you’re going to need fast autofocus, and long zoom lenses, and you might even want image stabilization. If you can’t focus on a bird before it disappears behind a tree, you’ve lost the shot. And if the bird is just a speck in the distance anyway, does it matter if you get the shot? Long lenses are expensive – can you afford one that will give you decent image quality?

  • Do you want pictures your friend’s band playing at the pub?

    Then low noise at high ISOs might be important to you so your shutter speed can be fast enough so not everything is blurred. You will also want lenses with a large aperture (or low f-stop). Lenses that let in a lot of light are much more expensive.

  • Do you want to take your camera kayaking, rock climbing, hiking, and other places it will be abused?

    This is my category. I don’t ever want to worry about if my camera is safe. I don’t want to worry about it getting wet. I just want it to be there whenever I want it, to get the shot I want. For this you want at least a water resistant camera, if not waterproof. You want something that’s not plastic, so if hits something, the most you’ll get is a ding or a scrape. You want a small camera, so you won’t get sick of carrying around.


I now have the Olympus E-1, which is an old digital SLR. No salesperson would ever try to sell it to you. Its only five megapixels, and Olympus will have a replacement for it this summer. But there are very few cameras out there right now that I would want more than this one, even if I had the money to buy anything.

The settings in the olympus are easy to change. There is a button for almost anything, and you rarely have to change any settings on the LCD. You want to change the exposure compensation – press the button and turn the wheel. You want to change the focus point – press the button and turn the wheel. The ISO – press the button and turn the wheel. Set the timer, change the bracketing settings, its all the same. This makes it very quick to set up for any situation. Now on some cameras, you don’t have to turn the wheel – you just press the button. The problem with this is that it can happen by bumping the camera, so your next few shots might be ruined until you realize you’re using the wrong settings.

The E-1 is water-resistant (and has lots of water resistant lenses for it). People have dropped their E-1s in puddles, they’ve washed them off under the sink when they get dirty. Of course Olympus doesn’t recommend this, but the camera seems to be able to handle a lot. I have taken it through everything from afternoon drizzles to all day jungle downpours. It just always works, and I don’t have to worry about it. It has a metal body, which is really durable. I haven’t exactly dropped it on rocks yet, but I’ve knocked it around a lot, and I’m fully expecting to abuse it more in the future. I want my camera to be able to handle that.

It is also easy to carry around. The E-1 has a large grip which my hand fits into very well. I can carry it in my hand all day and not get tired of holding it. I’m not scared of dropping it because of the rubber grip and the contours of the body that naturally keep it in my hand.

One part I haven’t touched on much yet, which is one of the most important parts is lenses. This will only apply to SLRs. If you buy a camera body, you will probably want to replace it in a year or two. Lenses rarely get outdated like this. Usually, you build up a collection of lenses for one brand, and replace your camera body with the same brand, so it fits all your lenses. So half of your decision to buy a camera should be based on whether that system has lenses you like or not. Generally, spending money on lenses is more important than spending money on your camera. They are much more of a sound investment, and will have a huge effect on the quality of the pictures you take. So I like Olympus in this regard because they have weather-sealed lenses, I can get a zoom range of 28mm to 400mm with only two (very good quality) lenses, both f2.8-3.5 over their zoom range, which is very good. These are also not massive lenses, so they are easy to take on hikes. I don’t want a massive camera bag to lug around with me everywhere.

Size is the one area where I’m not totally happy with the E-1 – it’s pretty big. Now the lenses more than make up for that (compared to other SLR lenses), but I do wish the E-1 was a little smaller. However, I’m not willing to give up good ergonomics for a smaller, lighter body (which would be the case for the Canon Digital Rebel). Olympus does have the E-410, which is a really good, and very small SLR. However, I’m not willing to give up the E-1’s weather-sealed body.

So we finally come to megapixels. The E-1 has only five. That’s old, outdated, and not up to industry standard (which makes it really inexpensive, especially on ebay). But wait a minute. I can print 16″ x 20″ prints that look great. The full size photos are larger than your computer monitor. Why do I need more megapixels? There are possible answers to that question. If I want to print larger or sell photos to stock photo agencies I may need more megapixels. But 5 megapixel images have graced full page spreads in National Geographic. More than likely, you won’t be limited by five megapixels. Sure, I’d take more if all things were equal, but they’re not equal and frankly megapixels are not that important.


Although you need to be comfortable working with your camera body, you need a lot more than a camera body to get good pictures. You need a tripod, you need the right lenses, and most of all you need skill and creativity. Honestly, you will probably be happy with whatever camera you buy, and no matter what you get, it will probably take great pictures. I just want to counteract the salespitch you will likely get at the store, and which has almost nothing to do with taking pictures.